So, you're here because you want to dive deep into the world of drawings of bat wings, huh? Whether you're an aspiring artist or just someone who's fascinated by these dark and mysterious creatures, you're in the right place. Bat wings have long been a symbol of mystery, power, and even a little bit of spookiness. But let's face it—they're also incredibly cool to draw. From their intricate details to their dramatic shapes, bat wings are a canvas of creativity waiting to be explored. So grab your pencils, sketchbooks, and let's get started!
Now, before we jump into the nitty-gritty, let’s talk about why bat wings are such a big deal in the art world. They’re not just random flappy things—they’re a masterpiece of nature’s design. Artists love them because they offer a chance to play with shadows, textures, and lines. Plus, they’re perfect for adding that gothic or fantasy vibe to your artwork. So whether you’re into horror, fantasy, or just love drawing animals, bat wings are definitely worth exploring.
But here's the thing—drawing bat wings isn’t always easy. There’s a lot to consider, from the anatomy of the wings to the way they move and stretch. Don’t worry though, because that’s exactly what we’re here for. In this article, we’ll break down everything you need to know to create stunning bat wing drawings that’ll make people go “Whoa!” Ready to take your art to the next level? Let’s do this!
Read also:Bolly4ucom Hollywood The Ultimate Guide To Your Favorite Movies
Understanding the Anatomy of Bat Wings
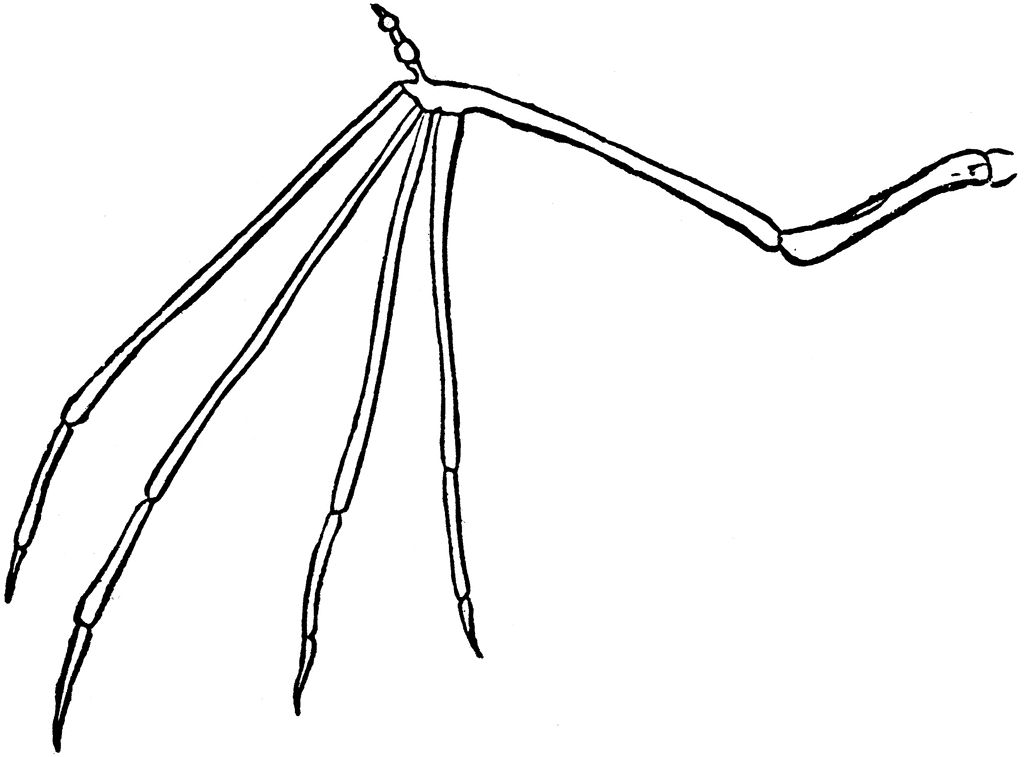
Alright, let’s start with the basics. If you want to draw convincing bat wings, you gotta understand how they’re built. Bat wings are actually pretty amazing—they’re made up of thin membranes stretched over elongated finger bones. Think of it like a human hand, but with super long fingers and a stretchy material connecting them. Cool, right?
Here’s a quick rundown of the key parts you need to know:
- Arm Bones: The upper arm (humerus) and lower arm (radius and ulna) provide the structure for the wing.
- Finger Bones: Bats have five fingers, but the thumb is small and clawed, while the other four are super long and support the wing membrane.
- Wing Membrane: This is the stretchy part that gives the wings their shape. It’s called the patagium, and it’s super thin but super strong.
- Tail Membrane: Some bats have a tail membrane called the uropatagium, which helps with balance and steering.
Now that you know the basics, it’s time to put pen to paper and start sketching. But remember, understanding anatomy isn’t just about memorizing parts—it’s about seeing how they all work together to create movement and form. So don’t rush this step!
Why Bat Wings Are Perfect for Art
Let’s be real—bat wings are basically made for art. They’re dramatic, they’re detailed, and they’re just plain cool. Artists love them because they offer so much room for creativity. You can go super realistic, or you can take a more stylized approach. The choice is yours!
Here are a few reasons why bat wings are such a great subject:
- Texture Galore: The wing membrane has a unique texture that’s perfect for shading and adding depth to your drawings.
- Dynamic Shapes: Bat wings are full of curves, lines, and angles that make them super interesting to draw.
- Fantasy Appeal: Whether you’re drawing a vampire bat or a mythical creature, bat wings add an instant touch of fantasy to your artwork.
Plus, they’re versatile. You can draw them in flight, at rest, or even folded up. The possibilities are endless!
Read also:Chamath Palihapitiya Wife The Woman Behind The Visionary Tech Tycoon
Tools You’ll Need to Draw Bat Wings
Before you start sketching, you’ll need the right tools. Here’s what I recommend:
- Pencils: A good set of graphite pencils is a must. I like to use a range from 2H to 6B for different levels of shading.
- Eraser: A kneaded eraser is perfect for lifting light lines, while a standard eraser is great for bigger mistakes.
- Sketchbook: Get one with thick paper so it can handle all the shading and layering you’ll be doing.
- Blending Tools: Tortillons or blending stumps can help smooth out your shading.
Of course, if you’re into digital art, you can use software like Procreate or Photoshop. But for now, let’s focus on the traditional approach—it’s more fun!
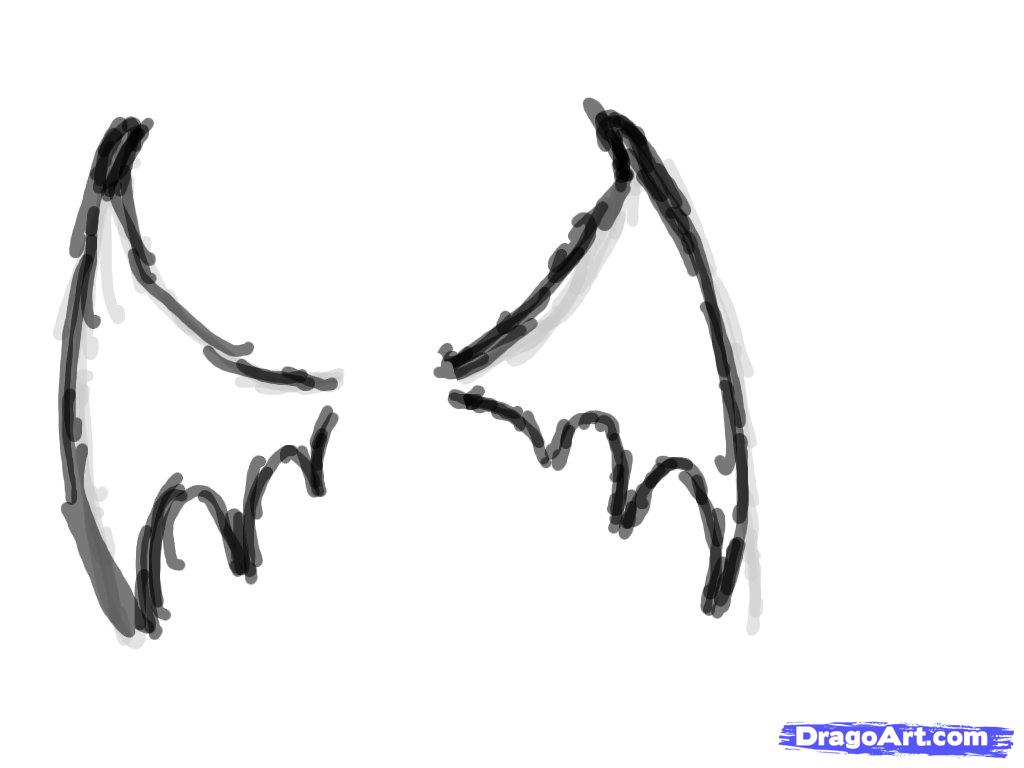
Step-by-Step Guide to Drawing Bat Wings
Step 1: Sketch the Basic Shape
Start with a light outline of the wing. Think of it like a big triangle with rounded edges. This will be your foundation, so don’t worry about getting it perfect right away.
Step 2: Add the Finger Bones
Now it’s time to add the finger bones. Draw four long lines extending from the base of the wing. These will be the fingers that support the membrane.
Step 3: Define the Membrane
Once you’ve got the fingers in place, start sketching the membrane. It should stretch between the fingers and curve slightly to give it a natural look.
Step 4: Add Details
This is where the fun begins! Start adding details like wrinkles, folds, and texture to the membrane. Don’t forget to include the tiny bones and veins that give bat wings their unique appearance.
Step 5: Shade and Refine
Finally, it’s time to shade your drawing. Use a range of pencils to create depth and dimension. Start light and gradually build up the shading until you’re happy with the result.
Tips for Drawing Realistic Bat Wings
Want to take your bat wing drawings to the next level? Here are a few tips to help you create more realistic and detailed wings:
- Study Real Bats: Look at photos or videos of real bats in flight to get a better understanding of how their wings move and stretch.
- Pay Attention to Proportions: Make sure the fingers, arm bones, and membrane are all in proportion to each other. This will help your wings look more natural.
- Experiment with Shading: Bat wings are full of shadows and highlights, so don’t be afraid to experiment with different shading techniques.
And remember, practice makes perfect. The more you draw, the better you’ll get!
Common Mistakes to Avoid
Even the best artists make mistakes, but here are a few common ones to watch out for when drawing bat wings:
- Forgetting the Fingers: It’s easy to focus too much on the membrane and forget about the finger bones. Don’t let that happen!
- Ignoring Texture: Bat wings have a unique texture that’s important to capture. Don’t skip this step!
- Overcomplicating the Design: Sometimes less is more. Don’t try to add every single detail—focus on the key elements that make the wings look realistic.
By avoiding these mistakes, you’ll be well on your way to creating stunning bat wing drawings.
Adding Your Own Style to Bat Wing Drawings
Now that you know the basics, it’s time to add your own personal touch. Whether you’re into gothic art, fantasy, or something completely different, there are plenty of ways to make bat wings your own. Here are a few ideas:
- Gothic Style: Add dark shading, sharp lines, and intricate details to give your wings a gothic feel.
- Fantasy Style: Experiment with colors, patterns, and otherworldly designs to create fantasy-inspired wings.
- Minimalist Style: Focus on clean lines and simple shapes for a more minimalist approach.
Let your imagination run wild and see where it takes you!
Resources for Learning More
If you want to take your bat wing drawings to the next level, there are plenty of resources out there to help you. Here are a few I recommend:
- Art Books: Look for books on animal anatomy or fantasy art for more in-depth knowledge.
- Online Tutorials: YouTube and other platforms have tons of tutorials on drawing bat wings.
- Art Communities: Join online forums or social media groups where you can share your work and get feedback from other artists.
And don’t forget to practice, practice, practice!
Conclusion: Take Flight with Your Art
So there you have it—everything you need to know about drawings of bat wings. From understanding anatomy to adding your own personal style, bat wings offer endless possibilities for creativity. Remember, the key to great art is practice and patience. Keep sketching, keep experimenting, and most importantly, have fun!
Now it’s your turn. Grab your pencils and start drawing those amazing bat wings. And when you’re done, don’t forget to share your work with the world. Who knows—you might just inspire someone else to take flight with their art too!
Table of Contents
- Understanding the Anatomy of Bat Wings
- Why Bat Wings Are Perfect for Art
- Tools You’ll Need to Draw Bat Wings
- Step-by-Step Guide to Drawing Bat Wings
- Step 1: Sketch the Basic Shape
- Step 2: Add the Finger Bones
- Step 3: Define the Membrane
- Step 4: Add Details
- Step 5: Shade and Refine
- Tips for Drawing Realistic Bat Wings
- Common Mistakes to Avoid
- Adding Your Own Style to Bat Wing Drawings
- Resources for Learning More
- Conclusion: Take Flight with Your Art